elida.maiques@gmail.com

Wednesday, July 20, 2011

Making a comic, step by step - STEP 10 (page 1)

STEP 10: Final version
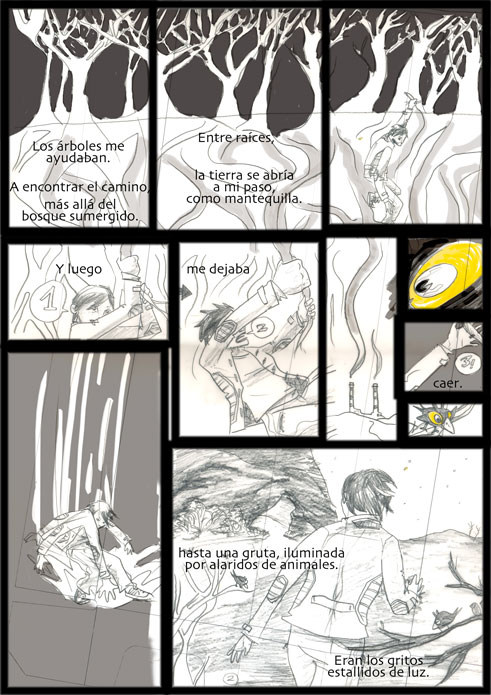
Decisions that I made (follow your intuition):
- keep a two-tone colour scheme. That will bring out the pencil work, rather than swallow it.
- simple black frames with even white spaces between them. Allows the panels to breath, time to pass, from one panel to the next.


PASO 10: Versión final
Decisiones que tomé (haz caso a tu intuición):
- seguir un esquema de color bitono. Resaltará el lápiz, en lugar de tragárselo.
- marcos para las viñetas negros y sencillos, con homogéneos espacios en blanco entre marco y marco. Permite que las viñetas respiren, y que el tiempo pase entre una viñeta y la siguiente.

Tuesday, July 19, 2011

Making a comic, step by step - STEP 9 (page 4)

And the last page, experimenting with digital colouring.
Also, look at the top of the page. When I drew it I did not keep to A3 proportions, I will have to fix that, perhaps enlarging the whole page.

Y la última página, experimentando con color digital.
Además, fíjense en la parte superior de la página. Al dibujarla no seguí las proporciones A3, voy a tener que arreglar esto, tal vez agrandando toda la página.

Monday, July 18, 2011

Making a comic, step by step - STEP 9 (page 3)

Still experimenting with the colour of frames.
In this comic, pages 1 and 4 are kinda set in awake time, pages 2 and 3 are set in dream time.
It would make sense to signal this with the colour of frames, hence the test here with a black to white gradient.

Aún experimentando con el color de las viñetas.
En este cómic, las páginas 1 y 4 tienen lugar en tiempo de vigilia, y las páginas 2 y 3 en tiempo de sueño.
Es por esto que tiene sentido señalizar este cambio con el color de las viñetas; de ahí esta prueba de gradación del negro al blanco.

Sunday, July 17, 2011

Making a comic, step by step - STEP 9 (page 2)

Trying out grid colour etc.

Probando colores para las viñetas, etc.

Friday, July 15, 2011

Making a comic, step by step - STEP 9


STEP 9: Colour and grids and text
Ouch, it's three steps in one, but this is how it happened.
I scanned my pencil drawing and started playing around in PhotoShop with colour and with different ways to frame the panels. I also inserted the voice over captions in the frames where it worked best regarding physical space and narrative.

PASO 9: Colores, cuadrículas y texto
Ay, son tres pasos en uno, pero así fue como pasó.
Escaneé mis dibujos a lápiz y comencé a jugar en PhotoShop con colores y con diferentes formas de hacer las viñetas. También incluí el texto de la voz en off en las viñetas donde mejor funcionaba narrativa y espacialmente.

Thursday, July 14, 2011

Making a comic, step by step - STEP 8


STEP 8: Fall in love with your linework
Take a look and enjoy it. It is a lot of work and you just finished erasing, redrawing, finalising, adding layers of details, shadowing bits...

For this comic, I only marked very lightly the grid and drew more or less within the limits.
First I did a rough version of the pencils, then I drew again, but a more detailed version, definitive, on tracing paper (I like tracing paper, but people tend to use light tables, so they draw in nice thick papers).

PASO 8: Enamórate de tu dibujo
Míralo y disfruta. Es un montón de trabajo y acabas de terminar de borrar, redibujar, pulir y añadir capas de detalles, sombreado...

Para este cómic sólo había marcado muy levemente la cuadrícula de las viñetas, y dibujé más o menos dentro de los límites.
Primero hice una versión rápida del lápiz, luego lo dibujé de nuevo, una versión más detallada, definitiva, en papel transparente de calco (me gusta el papel transparente, aunque la gente suele calcar dibujos utilizando mesas de luz, lo que les permite dibujar en papeles de mayor gramaje).

Wednesday, July 13, 2011

Making a comic, step by step - STEP 7


STEP 7: Draw.
First with pencil then with ink, digital brush, etc, it is your choice.
Think about how you want to publish it. That may help you decide your technique.
Usually, a black ink drawing prints better in any old printer than a pencil drawing.

Try to keep a white space between panel and panel, don't cluster them together.


PASO 7: Dibujar.
Primero con lápiz y luego con tinta, pincel digital, etc, es tu elección.
Pensar cómo quieres publicarlo te puede ayudar a elegir una técnica.
Normalmente, un dibujo a tinta negra quedará mejor impreso en cualquier tipo de impresora que un dibujo a lápiz.

Intenta mantener un espacio en blanco entre las viñetas, que no estén pegadas.

Making a comic, step by step - STEP 6


STEP 6: The frames.
I decided to draw on A3 paper, using as a starting point a basic grid of 3 x 3 frames.
I measured and divided roughly the A3 in 3 x 3 rectangles: each rectangle, 9 cm x 12 cm.
To draw the grid, I cut out a 9 x 12 cm rectangle of cardboard.

Then just copied its contour onto my A3 paper.
This probably is not the best way to do it, but it works for me (and I have the cardboard frame for future comics).

PASO 6: Las viñetas.
Decidí dibujar en papel A3, usando como punto de partida una distribución básica de 3 x 3 viñetas.
Medí y dividí a grosso modo el A3 en 3 x 3 rectángulos: cada rectángulo, 9 cm x 12 cm.
Para dibujar las viñetas, recorté un rectángulo de cartón de 9 x 12 cm.

Luego fui copiando su contorno en mi A3.
Probablemente ésta no sea la mejor forma de hacerlo, pero a mí me funciona (y me he guardado el rectángulo de cartón, para futuros cómics).